The Scratch Test involves applying a known force to create a scratch on a material's surface, observing changes in the scratch's depth and width, to assess the material's hardness, adhesion, and wear resistance.
1.Introduction
Scratch testing is a crucial method used to evaluate the adhesion and durability of materials, particularly in applications where surface integrity is essential. This testing technique involves applying a controlled force to a material's surface using a sharp object, creating a scratch. The primary objectives of scratch testing include:
Assessing Adhesion Strength: By observing how well a coating or material adheres to a substrate, scratch testing helps determine the effectiveness of the bonding process.
Evaluating Surface Durability: The test provides insights into how a material will perform under mechanical stress, which is vital for applications in various industries, including automotive, aerospace, and electronics.
Identifying Material Properties: Scratch testing can reveal important characteristics such as hardness, brittleness, and resistance to wear, contributing to material selection and design decisions.
Quality Control: Regular scratch testing can be part of a quality assurance program, ensuring that materials meet specified performance standards before they are used in production.
Overall, scratch testing is an essential tool for engineers and material scientists, providing valuable data that informs product development and enhances material performance.
2. Scope
Scratch testing plays a vital role in both material science and various applications across industries. Its scope can be understood through the following dimensions:
Applicable Material Types:
Metals: Used to evaluate surface hardness and wear resistance, commonly applied in automotive parts and aerospace components.
Ceramics: Assesses surface hardness and crack resistance, widely used in electronic devices and industrial applications.
Polymers & Plastics: Evaluates surface wear resistance, utilized in electronic device housings and packaging materials.
Coatings & Thin Films: Tests adhesion and wear resistance of coatings, applied in automotive finishes and protective metal films.
Industries and Applications:
Automotive Industry: In automotive applications, scratch testing evaluates the durability of exterior coatings and finishes, ensuring they can withstand environmental stressors and mechanical wear.
Aerospace Sector: For aerospace components, scratch testing assesses the integrity of protective coatings on critical parts, contributing to safety and performance.
Electronics: In the electronics industry, scratch testing is crucial for evaluating the robustness of surface finishes on circuit boards and components, which can affect functionality and longevity.
1. How to evaluate the results of scratch testing?
A: The evaluation of scratch testing typically includes the following aspects:
Scratch Depth: The depth of the scratch reflects the hardness of the material surface. The deeper the scratch, the easier it is for the surface to be damaged.
Scratch Width: The width of the scratch reflects the material's resistance to friction. A wider scratch indicates that the material is more likely to be damaged under lower loads.
Scratch Morphology: Evaluate the morphology of the scratch, such as whether cracks, delamination, or peeling occur.
Load-Scratch Distance Curve: Observe the relationship between the normal load and scratch distance to assess the material's response under different loads.
2. What is the difference between scratch testing and friction testing?
A: Scratch testing and friction testing both involve the material's surface response to external forces, but they differ in testing methods and focus. Scratch testing primarily evaluates the surface hardness and scratch resistance of the material, while friction testing mainly assesses the coefficient of friction and wear resistance of materials during sliding or contact. Scratch testing focuses on localized surface damage, whereas friction testing focuses on the durability of materials under continuous contact.
3. How to handle sample damage during scratch testing?
A: During scratch testing, sample surfaces may experience cracking, peeling, or delamination, typically due to excessive load or the material's inherent brittleness. To avoid excessive sample damage, it is recommended to use different loads in incremental steps and select an appropriate load range based on the material's properties (e.g., hardness, brittleness). Additionally, selecting the correct tip shape and testing speed for the scratch tool can help minimize damage.
Scratch Testing has various applications across different material types and industries:
Applicable Material Types:
Metals: Used to evaluate surface hardness and wear resistance, commonly applied in automotive parts and aerospace.
Ceramics: Assesses surface hardness and crack resistance, widely used in electronic and industrial ceramics.
Polymers & Plastics: Evaluates surface wear resistance, used in electronic device housings and packaging materials.
Coatings & Thin Films: Tests adhesion and wear resistance of coatings, applied in automotive coatings and metal films.
Industries and Applications:
Automotive: Tests the scratch resistance of car body coatings and components.
Aerospace: Assesses wear resistance of aircraft parts.
Electronics & Semiconductors: Evaluates scratch resistance of smartphone screens and semiconductor films.
Construction & Decoration: Assesses the wear resistance of tiles, flooring, and other surface materials.
Medical Devices: Ensures the durability of surfaces on surgical tools and medical equipment.
Scratch testing helps ensure material durability, adhesion, and long-term stability across various industries.
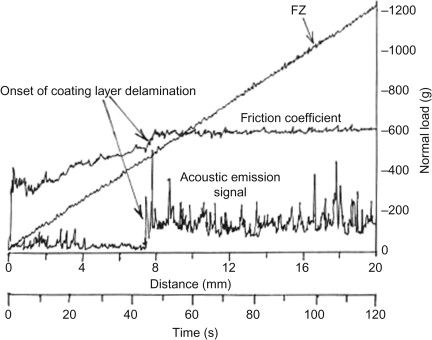
Caption: Normal load vs. scratch distance curve during the scratch testing of the sample
To ensure accurate scratch testing results, please follow these sample preparation guidelines:
Sample Requirements: The sample should have a diameter of 5-30mm, height of 5-10mm (square or cylindrical shape), and planar dimensions of 5-20mm. Irregular samples must be adhered to a regular hard block.
Surface Condition: The top and bottom surfaces of the sample must be parallel, with no visible defects or marks.
Thickness Adjustment: If the sample thickness does not meet the requirements, the sample can be raised with a spacer.
Hardness Limit: The hardness of the test sample should not exceed 20 GPa.
Contact our team for assistance with any special material conditions or testing requirements, ensuring the most accurate and reliable results.
Consumer Products: Scratch testing is applied to consumer goods, such as appliances and furniture, to ensure that surfaces remain aesthetically pleasing and functional over time.
Medical Devices: In the medical field, scratch testing helps ensure that surfaces of devices are durable and can withstand cleaning and sterilization processes without degrading.
Overall, the scope of scratch testing encompasses a wide range of materials and applications, making it an essential tool for ensuring performance, safety, and reliability across various industries.
3. Principle
Scratch testing involves applying a controlled force to a material's surface using a sharp indenter to create a scratch. The indenter, typically made of a harder material, moves across the surface while varying the load to assess the material's response. The resulting scratch characteristics—depth, width, and morphology—are analyzed to determine properties such as hardness, adhesion strength, and durability. This method provides insights into material behavior under mechanical stress, aiding in material selection and product design across various industries.
4. Test Procedure
Preparation of Samples: Ensure that the material samples are clean and free from contaminants. Cut them to the required dimensions if necessary.
Equipment Setup: Calibrate the scratch testing machine according to the manufacturer's specifications. Select the appropriate indenter based on the material type and desired test parameters.
Indenter Selection: Choose a suitable indenter material and shape (e.g., diamond, tungsten carbide) based on the hardness of the sample being tested.
Load Application: Set the initial load and speed for the test. The load should be gradually increased to assess the material's response under different stress levels.
Conducting the Test: Position the sample securely in the testing apparatus. Start the test, allowing the indenter to move across the surface at a controlled speed while applying the predetermined load.
Observation and Recording: Monitor the scratch formation during the test. Record parameters such as scratch depth, width, and any visible damage (e.g., cracks or delamination).
Post-Test Analysis: After completing the test, examine the scratched surface using optical or electron microscopy to assess the scratch characteristics in detail.
Data Interpretation: Analyze the recorded data to evaluate the material's hardness, adhesion strength, and overall performance. Compare results against established standards or specifications.
Reporting: Compile the findings into a report, including test conditions, observations, and conclusions regarding the material's properties.
This systematic approach ensures accurate and reliable results in scratch testing, facilitating informed decisions in material selection and application.
5. Sample Requirements
Material Type: Samples should represent the specific material being tested, such as metals, ceramics, polymers, or coatings.
Dimensions: Samples should be of uniform size and shape, typically rectangular or square, with dimensions that fit the testing apparatus. Common sizes range from 10 mm x 10 mm to larger depending on the equipment.
Surface Finish: The surface should be smooth and free from defects, contaminants, or irregularities. Pre-treatment may be required, such as polishing or cleaning, to ensure accurate results.
Thickness: For layered materials or coatings, the thickness should be consistent and within specified limits to avoid variability in test results.
Quantity: Multiple samples may be required to ensure statistical validity and repeatability of results. Typically, at least three samples are recommended for each test condition.
Environmental Conditions: Samples should be conditioned at room temperature and humidity before testing to minimize the effects of environmental factors on the results.
Identification: Each sample should be clearly labeled with relevant information, such as material type, treatment method, and any other pertinent details to ensure traceability during testing.
These requirements help ensure that scratch testing yields reliable and reproducible results, facilitating accurate assessments of material properties.
6. Pros and Cons
Advantages:
Simple and Cost-Effective: Scratch testing is relatively straightforward to perform and requires minimal equipment, making it a cost-effective method for evaluating material properties.
Quick Results: The test can be conducted rapidly, providing immediate insights into the material's hardness, adhesion, and wear resistance.
Versatile: Applicable to a wide range of materials, including metals, ceramics, polymers, and coatings, making it useful across various industries.
Quantifiable Data: Provides measurable parameters such as scratch depth and width, allowing for objective comparisons between materials.
Quality Control: Useful in quality assurance processes to ensure that materials meet specified performance standards before production.
Disadvantages:
Surface Damage: The test inherently damages the material's surface, which may not be acceptable for certain applications where surface integrity is critical.
Limited Scope: While it provides valuable information about surface properties, it may not fully represent the material's overall performance under different conditions.
Variability: Results can be influenced by factors such as indenter type, load application, and sample preparation, leading to variability in outcomes.
Not Comprehensive: Scratch testing does not assess other important properties, such as tensile strength or impact resistance, which may be necessary for a complete material evaluation.
Requires Calibration: Accurate results depend on proper calibration of the testing equipment, which can introduce errors if not maintained correctly.
Overall, while scratch testing is a valuable tool for assessing material properties, it is essential to consider its limitations and complement it with other testing methods for a comprehensive evaluation.
7. Example results
Caption: Normal load vs. scratch distance curve during the scratch testing of the sample
8. FAQ
(1) How to evaluate the results of scratch testing?
A: The evaluation of scratch testing typically includes the following aspects:
Scratch Depth: The depth of the scratch reflects the hardness of the material surface. The deeper the scratch, the easier it is for the surface to be damaged.
Scratch Width: The width of the scratch reflects the material's resistance to friction. A wider scratch indicates that the material is more likely to be damaged under lower loads.
Scratch Morphology: Evaluate the morphology of the scratch, such as whether cracks, delamination, or peeling occur.
Load-Scratch Distance Curve: Observe the relationship between the normal load and scratch distance to assess the material's response under different loads.
(2) What is the difference between scratch testing and friction testing?
A: Scratch testing and friction testing both involve the material's surface response to external forces, but they differ in testing methods and focus. Scratch testing primarily evaluates the surface hardness and scratch resistance of the material, while friction testing mainly assesses the coefficient of friction and wear resistance of materials during sliding or contact. Scratch testing focuses on localized surface damage, whereas friction testing focuses on the durability of materials under continuous contact.
(3) How to handle sample damage during scratch testing?
A: During scratch testing, sample surfaces may experience cracking, peeling, or delamination, typically due to excessive load or the material's inherent brittleness. To avoid excessive sample damage, it is recommended to use different loads in incremental steps and select an appropriate load range based on the material's properties (e.g., hardness, brittleness). Additionally, selecting the correct tip shape and testing speed for the scratch tool can help minimize damage.
9. Conclusion
Scratch testing is an essential method for assessing the wear resistance, adhesion strength, and surface durability of materials under mechanical stress. This technique provides valuable insights into material hardness, coating performance, and potential failure modes, helping in material selection, surface treatment evaluation, and quality assurance in various applications.
Contact us today to discuss your testing requirements or to submit your samples for scratch testing analysis.